Freeing Samsung Galaxy S2 memory

The manual procedure below simply frees some MB of memory which can hold you from installing an app and no memory manager, which I am aware of, is able to do it.

A simple way to free up storage space is by deleting all the log files in the device memory. Just dial *#9900# on your phone and select option 2 “Delete dumpstate/logcat” in the prompted menu. It’s not necessary to root your phone either. That’s it!

Getting clocks synchronized on OpenRemote eBox

In the real time application, which OpenRemote usually is, it is very important to have clocks synchronized so they do not drift away too much. Nowadays, computers have usually a cheap real time clock hardware which can easily drift even few seconds in 24h! You can check easily how your machines are in sync with the date command. Below is example of running this command on my LAN:

michal@rutek06 ~> date; ssh ds date; ssh root@orb date;
Mon Oct 6 11:35:21 CEST 2014

It is run from my Mac, I have a Synology NAS with alias ds and OpenRemote eBox with alias orb. As you can see, all they are pretty good in sync. To achieve this the Network Time Protocol (NTP) is used. Follow these steps in order to configure ntp on the OpenRemote eBox (NAS configuration is quite similar):

  1. Login to ebox with:
    # ssh root@orb
  2. Install ntp:
    # apt-get update

    # apt-get install ntp
    This will run ntpd. However there is a problem as the ntpd can sometimes exit due to the following: once the clock has been set an error grater than 1000s will cause ntpd to exit anyway.

  3. Therefore edit ntp.conf and add tinker panic 0 line to it:
    # vi /etc/ntp.conf
    itinker panic 0[Enter][ESC]:w
    q
  4. By default eBox is configured to sync its time once when the network interface comes up using ntpdate. This can can cause racing with ntpd resulting in intermittent shutting down of ntpd. To get rid of this you can either uninstall ntpdate or add exit 0 as 2nd line to the startup configuration file:
    # vi /etc/network/if-up.d/ntpdate
    jiexit 0[Enter][ESC]:wq
  5. Now it time to check the date:
    # date
    Sometimes a time zone need to be set correctly. For setting the time zone to Central European Time (CET) please do the following:
    # ln -sf /usr/share/zoneinfo/CET /etc/localtime
    In case the time zone is still not correct:
    # apt-get install tzdata

After this you would never worry again about clock synchronization across controllers. IMHO this should be the default OpenRemote eBox configuration.

Persistent in-memory variables

Openremote default configuration suffers the illness of cheap Chinese devices — it forgets almost everything after power on/off cycle. This article describes how to preserve in-memory variables. If you want to save your in memory variables with rules presented here, please follow these guidelines:

  • A name of in-memory variable, which should be preserved between restarts, must begin with capital string “GV”, for example “GVRememberThis”;
  • This in-memory variable should have command ‘status’;
  • Sensor associated with this command should have exactly the same name — in our example “GVRememberThis”;
  • The sensor should be of type ‘custom’.

When you follow these guidelines and add following rules in the designer then Openremote controller will miraculously remember all “GV” started in-memory variables. GV stays for Global Variable.

package org.openremote.controller.protocol.preserve;
import java.io.*;
import org.openremote.controller.protocol.Event;
global org.openremote.controller.statuscache.CommandFacade execute;

function void _WriteToFile(String fn, Object o){
  String vl = o.toString();
  PrintWriter writer = new PrintWriter(fn+".txt", "UTF-8");
  try{
    writer.println(vl);
  } finally {
    writer.close();
  }
}

function String _ReadFromFile(String fn, String dft){
  String result = dft;
  try{
    BufferedReader fr = new BufferedReader(new InputStreamReader(new FileInputStream(fn+".txt"), "UTF-8"));
    try{
      result = fr.readLine();
    } finally {
      fr.close();
    }
  } catch (IOException e) {
    e.printStackTrace();
  }
  return(result);
}

rule "Store values"
timer(int: 1s)                                                                                             
when
  Event($s:source matches "^GV.*", $v:value!="status")
then
  _WriteToFile($s, $v);
end

rule "Init values"
  salience 100
when
(OR
  Event($s:source matches "^GV.*", value=="")
  Event($s:source matches "^GV.*", value=="status")
)
then
  execute.command($s, _ReadFromFile($s, "-"));
end

You can either use these rules in designer or save it separately in your controller’s subdirectory [path to the controller]/webapps/controller/rules/. The second solution has an advantage that these rules will always be available — even if there are no rules in the designer or rules are with errors. It should be a part of the standard Openremote distribution if you ask me 😉

Switch wireless devices reliable through Drools in OpenRemote

This post summarises my experience with having a wireless appliance switched on and off at certain parts of a day. This is a nice example of using Drools timers and internal facts.

Wireless suffers the problem of unreliable communication in a noisy, long distance environment. Even in the same room sometimes the transmission fails, this is my experience with EnOcean, Z-wave and WeMo. Luckily, this problem can be solved in Openremote in a smart way by sensing back the switch state and deciding if retransmission is necessary. This is an unique characteristics of Openremote architecture not commonly found in other home automation controllers. The algorithm presented below addresses this problem and is in my humble opinion a must have for everyone who has a need of reliable wireless switching.

First I’ve declared a fact which will be used by the switching algorithm state machine.

declare SocketState
  @role(event)
  on : int
  // -1: idle
  //  0: switching off
  //  1: switching on 
end

rule "Init SocketState"
when
then
  insert(new SocketState(-1));
end

Next, the rule for initiating switching on the appliance every Friday at 6:10 AM:

rule "Lamp on"
  timer(cron: 0 10 6 ? * fri) 
when
  Event(source=="SocketSwitching1.STATE", value=="off")
  $s: SocketState(on!=1)
then
  $s.setOn(1);
  update($s);
end

Note that the rule is executed only when socket is not yet turned on and not in switching StcketState. All it does is setting the SocketState fact into switching on state and pass it to other rules with update() statement.

Now, we will be sending wireless telegrams to the switching socket every 5 seconds as long as its state is off. Usually the light go on immediately, however when it is noisy few retransmissions are necessary.

rule "Lamp on execute"
  timer(int: 0s 5s) // repeat every 5 seconds
when
  $s: SocketState(on==1)
  Event(source=="SocketSwitching1.STATE", value=="off")
then
  execute.command("SocketSwitching1.ON"); // Light ON
end

Finally when the socket state is changed to on it is marked by SocketState fact:

rule "Lamp on executed"
when
  $s: SocketState(on==1)
  Event(source=="SocketSwitching1.STATE", value=="on")
then
  $s.setOn(-1);
  update($s);
end

The same algorithm is used for switching the socket off on 6:25 AM.

rule "Lamp off"
  timer(cron: 0 25 6 ? * fri) 
when
  Event(source=="SocketSwitching1.STATE", value=="on")
  $s: SocketState(on!=0)
then
  $s.setOn(0);
  update($s);  
end

rule "Lamp off execute"
  timer(int: 0s 5s)
when
  $s: SocketState(on==0)
  Event(source=="SocketSwitching1.STATE", value=="on")
then
  execute.command("SocketSwitching1.OFF"); // Light OFF
end

rule "Lamp off executed"
when
  $s: SocketState(on==0)
  Event(source=="SocketSwitching1.STATE", value=="off")
then
  $s.setOn(-1);
  update($s);
end

Because ON and OFF states sent by socket can easily be missed in noisy environment an extra bit of robustness is achieved by declaring the ON state in case when non-zero power measurement message arrives:

rule "SocketSwitching1 state ON through power"
// Set state ON when power is not 0
when
  Event(source=="SocketSwitching1.POWER", value!="0")
  Event(source=="SocketSwitching1.STATE", value!="on")
then
  execute.command("SocketSwitching1.ON");
end

The last touch is to retract the last power measurement fact so the repeating same values are processed by the rules engine. Without this rule when power measurement value stays the same the “SocketSwitching1 state ON through power” rule will be triggered only once (this is due to implementation of Drools engine within Openremote).

rule "SocketSwitching1 retract last power measurement"
salience -100 // Because of retracting of the event
when
  $s : Event(source=="SocketSwitching1.POWER",$v:value)
then
  retract($s);
end
No more free DynDNS … time for ORDNS :-)

Last Wednesday on May 7th 2014 DynDNS stopped with their free services. For people who like me use VPN to connect their home LAN this is not a pleasant message. The cheapest paid service from DynDNS is priced at $25/year. Luckily we have OpenRemote and it is very easy to recreate the dynamic DNS service for free. Please follow the steps:

  • register a domain name if you don’t already have one which you will be using for your home LAN. Free domains can be registered here freenom.com.
  • apply for free DNS service here namecheap.com. Setup the dynamic DNS service there too. This step will generate a password which will be used in the OpenRemote setDDNS command later.
  • create command in OpenRemote designer to read your external IP address: name = externalIP, protocol = HTTP, URL = http://ipecho.net/plain, HTTP method = GET, polling interval = 30m.
  • create sensor: name externalIP, command: externalIP, type: custom.
  • create command for setting the address record: name = setDDNS, protocol = HTTP, URL = http://dynamicdns.park-your-domain.com/update?host=@&domain=openremote.pl&password=password_at_namecheap.com&ip=${param}, HTTP method = GET.
  • create rules to forward your external IP changes:
    declare ExternalIP
      @role(event)
      ip : String
    end
    
    rule "ExternalIP init"
    when
      Event(source=="externalIP", $v: value)
      not ExternalIP()
    then
      insert (new ExternalIP($v.toString()));
      String message = "External IP initialized: '"+$v.toString();
      My_NMA nma = new My_NMA(message, -2);
      insert(nma);
      execute.command("setDDNS" , $v.toString());
    end
    
    rule "ExternalIP change"
    when
      Event(source=="externalIP", $v: value, value != "")
      $e: ExternalIP($i: ip, ip != $v)
    then
      String message = "External IP changed: '"+$i+"' -> '"+$v.toString()+"'";
      My_NMA nma = new My_NMA(message, 1);
      insert(nma);
      $e.setIp($v.toString());
      update($e);
      execute.command("setDDNS" , $v.toString());
    end


    The code above also sends push message to my smartphone using the Notify My Android service. Of course you can also use the Pushover service or remove the notification code from the rules.

  • In case you don’t need push service notifying about IP change then the rule below is all you need:
    rule "ExternalIP DDNS"
    when
      Event(source=="externalIP", $v: value!="")
    then
      execute.command("setDDNS" , $v.toString());
    end
    

Bravo, your OpenRemote is now paying you back 25$ a year for a VIP DynDNS account 😉

Sending Pushover notifications from Openremote

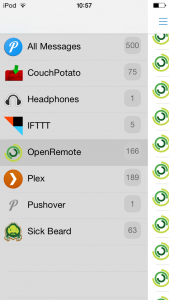
pushover summarypushover listPushover is a simple mobile notification system available for Android and iOS. It is similar to the Notify My Android however it is not free. Its API makes it possible to configure messages with custom icons (see images left) and notifications are easily send from within OpenRemote.

To send a message first you need to create a command:

  • name pushover.post
  • protocol HTTP
  • URL https://api.pushover.net/1/messages.json?token=aKfht4NDW5RimyYxXUhS6ADsURrqCH&user=yourUserKeyAfterRegistration&message=${param}
  • HTTP method POST

There are more parameters available and described in details on Pushover API’s page.
Note that the call uses ${param} to pass the message text from a rule:

rule "System start"
when eval(true)
then
  execute.command("pushover.post", "System start");
end

Integrating Eltako’s Socket Switching Actuator FSVA-230V

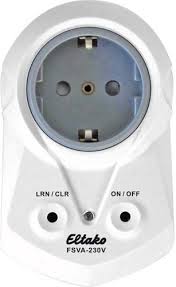
The FSVA-230V is EnOcean socket actuator with power measurement. After switching it reports it’s state and periodically it sends power measurement results. More informations about this device are on Eltako’s web site. Beside of switching socket and power measurement it also incorporates EnOcean repeater which can be used to extend the coverage.

The switching actuator can be learned to work with push buttons or window/door contacts. Currently it is possible to send a push button messages from openremote therefore they are used to drive the socket.

Actuator commands used to turn the switch off and on:

  • Command: SocketSwitching1.ON, Protocol: EnOcean, Device ID: 0x01, EnOcean Command: ON_ROCKER_A, EnOcean Equipement Profile (EEP): F6-02-01
  • Command: SocketSwitching1.OFF, Protocol: EnOcean, Device ID: 0x01, EnOcean Command: OFF_ROCKER_A, EnOcean Equipement Profile (EEP): F6-02-01

Sensor commands for reading the switch state and power measurements:

  • Command: SocketSwitching1.STATE, Protocol: EnOcean, Device ID: one from the log file or found with Dolphin tools, EnOcean Command: STATUS_ROCKER_A, EnOcean Equipement Profile (EEP): F6-02-01
  • Command: SocketSwitching1.POWER, Protocol: EnOcean, Device ID: as above, EnOcean Command: MR, EnOcean Equipement Profile (EEP): A5-12-01

Finally here are the sensors and a switch definitions:

  • Sensor: SocketSwitching1.POWER, Command: SocketSwitching1.POWER, Type: Custom, Custom state items: empty
  • Sensor: SocketSwitching1.STATE, Command: SocketSwitching1.STATE, Type: Custom, Custom state items:
    Name: Value:
    off ROCKER_BI
    on ROCKER_BO
  • Switch: SocketSwitching1.SWITCH, Sensor: SocketSwitching1.STATE, Command on: SocketSwitching1.ON, Command off: SocketSwitching1.OFF

Integrating Belkin’s WeMo switch and motion with Openremote

WeMo-Sw+MoBelkin offers WiFi enabled power switch and motion sensor for less than $80 http://www.belkin.com/. They connect with home WiFi network and are visible on LAN. Furthermore, they use the UPnP (Universal Plug and Play) protocol which details are easy to find with a Google search. At this moment UPnP protocol is not directly available within Openremote therefore for this integration I’ve used the Shell execution protocol to run curl in order to turn the switch position and also to sensor motion and switch state. It is possible to switch the socket through generic TCP/IP protocol, however reading back a status is unreliable. This is due to the fact that the reply is frequently split into 2 TCP/IP messages, the first part with an HTTP UPnP header and the second one with the message body itself. The TCP/IP implementation in Openremote receives only the first packet frequently missing the second part with an actual status. Nevertheless, it works good with the Shell execution protocol with the only disadvantage that a caution must be taken when porting this code on a different platform. For this integration example I’ve used the professional OpenRemote eBox which is running the Linux Voyage OS. I assume that WeMo switches are already connected with the home WiFi LAN which is achieved by following the standard installation procedure as provided by Belkin. Next I’ve used Android Fing app to scan my network and discover WeMo IP addresses which will be needed when configuring Openremote commands. Apparently WeMo devices’ ethernet address starts with EC:1A:59 and this information simplifies locating them within a crowded LAN environment like mine is. After discovering the IP addresses of WeMo devices please use the following steps to use them in the Openremote designer.

  1. create following files on the OR controller:
    root@orb:/root/wemo# ls -l
    -rw-r--r-- 1 root root 272 Feb  4 13:17 get.xml
    -rw-r--r-- 1 root root 300 Feb  4 13:17 off.xml
    -rw-r--r-- 1 root root 301 Feb  4 13:17 on.xml
    -rwxr-xr-x 1 root root 737 Feb  4 17:39 post.sh
    -rwxr-xr-x 1 root root 737 Feb  4 19:58 post_get.sh
    
    root@orb:~/wemo# cat get.xml
    
    
    root@orb:~/wemo# cat off.xml 
    0
    
    root@orb:~/wemo# cat on.xml 
    1
    
    root@orb:~/wemo# cat post.sh 
    #!/bin/sh
    curl -0 -A '' -v -X POST -H 'Accept: ' -H 'Content-type: text/xml; charset="utf-8"' -H "SOAPACTION: \"urn:Belkin:service:basicevent:1#SetBinaryState\"" --data @`dirname $0`/$3.xml http://$1:$2/upnp/control/basicevent1 
    
    root@orb:~/wemo# cat post_get.sh 
    #!/bin/sh
    curl -0 -A '' -v -X POST -H 'Accept: ' -H 'Content-type: text/xml; charset="utf-8"' -H "SOAPACTION: \"urn:Belkin:service:basicevent:1#GetBinaryState\"" --data @`dirname $0`/$3.xml http://$1:$2/upnp/control/basicevent1 
    

    For my integration I’ve put these files in /root/wemo directory on my eBox. For doing this you need to use ssh login. Of course you can place these files in any desired location as long as you adjust parameters of the Shell execution command.

  2. Create following openremote commands in the designer:
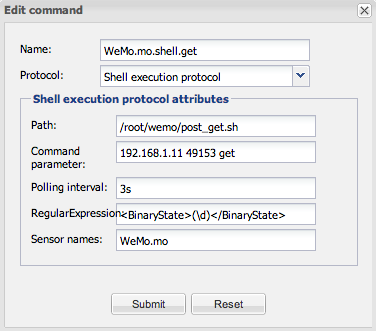
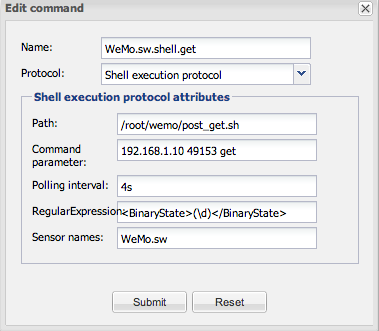
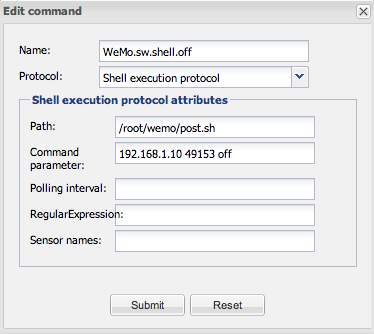
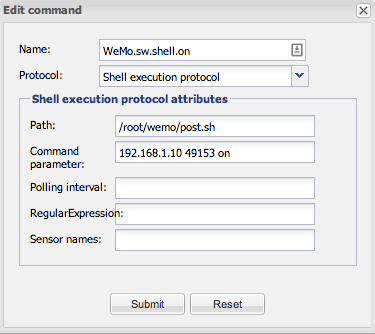
    WeMo.mo.shell.get

    WeMo.sw.shell.get

    WeMo.sw.shell.off

    WeMo.sw.shell.on

    As you can see my WeMo devices are at IP addresses 192.168.1.10 (switch) and 192.168.1.11 (motion).

  3. Crate 2 sensors: WeMo.mo (command WeMo.mo.shell.get, type Custom) and WeMo.sw (command WeMo.sw.shell.get, type Custom)

Now WeMo devices should be available in the Openremote designer.

Integrating Eltako F2L61NP EnOcean actuator with OpenRemote

20131018_095154The F2L61NP actor is a 2-speed fan relay which can be teach-in to work with many sensors – push buttons, temperature, humidity, occupancy, etc. For full specification please consult the data sheet. Unfortunately, at this moment Openremote can send only F6-02-01 EEP (push button), which means that if you need to couple other type of sensors with this actuator then a conversion need be done inside of the Openremote. Luckily it is quite simple with the Drools rule engine, however how to do this is outside of the scope of this post.

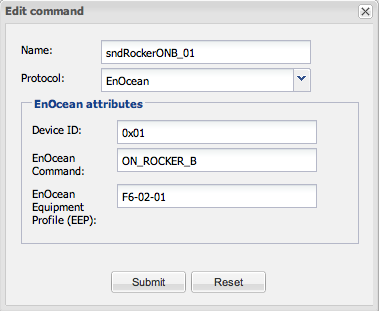
In order to learn this actor to work with Openremote a command to proxy push button press need to be defined:
on_rocker_b
Here, the Device Id can have any value between 1-255 and EEP must be F6-02-01. For EnOcean command the following values are possible:

  • PRESS_ROCKER_AI – Press bottom left button;
  • RELEASE_ROCKER_AI – Release bottom left button;
  • PRESS_ROCKER_AO – Press upper left button;
  • RELEASE_ROCKER_AO – Release upper left button;
  • ON_ROCKER_A – Press and release bottom left button = PRESS_ROCKER_AI+RELEASE_ROCKER_AI;
  • ON – Press and release bottom left button;
  • OFF_ROCKER_A – Press and release upper left button = PRESS_ROCKER_AO+RELEASE_ROCKER_AO;
  • OFF – Press and release upper left button;
  • PRESS_ROCKER_BI – Press bottom right button;
  • RELEASE_ROCKER_BI – Release bottom right button;
  • PRESS_ROCKER_BO – Press upper right button;
  • RELEASE_ROCKER_BO – Release upper right button;
  • ON_ROCKER_B – Press and release bottom right button = PRESS_ROCKER_BI+RELEASE_ROCKER_BI;
  • OFF_ROCKER_B – Press and release upper right button.

When you link one of these commands with a button in UI and press it when the actor is in the LRN mode then the coupling will be created.

Integrating Thermokon SR04PS EnOcean wireless room temperature sensor with OpenRemote

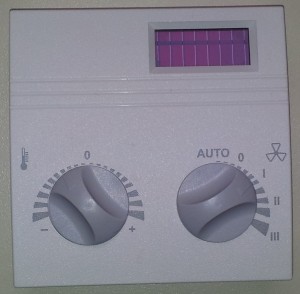
20131018_095424Solar energy harvesting temperature sensor with an optional battery for placement in shadow places.

Thermokon SR04PS wireless room temperature sensor is has 3 sensors on board:

  1. temperature (TMP);
  2. set point adjustment (SP);
  3. fan speed switch (FAN).

The data sheet is available on Thermokon website SR04.
In order to make these sensors available in Openremote follow the steps:

  1. Find the device Id using either EnOcean Dolphin View software or taking a look at EnOcean log file in Openremote which is under OpenRemote/logs/enocean subdirectory;
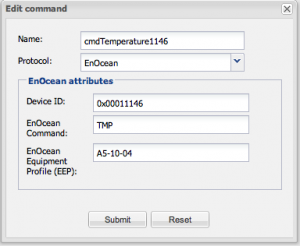
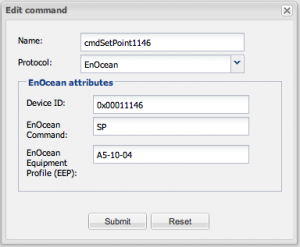
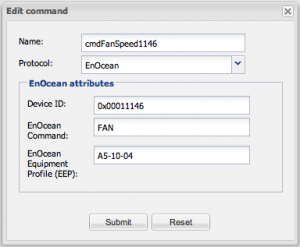
  2. Create new commands for reading out the sensors using the device Id from the previous point and the A5-10-04 EnOcean Equipment Profile (EEP):
    • SR04PS-TMP
      SR04PS-SP
      SR04PS-FAN
  3. Create 3 sensors and link them to commands created in the previous step.

Now you should have 3 new sensors available in the Openremote Designer ready for use during UI design or rules definition.