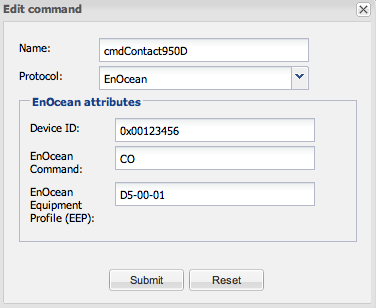
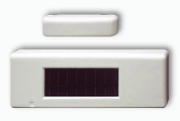
Eltako’s FTK is a wireless window/door contact. For more information see FTK data sheet. One he biggest advantage of these sensor is that they resend their status periodically which ensures correct state even if one of more messages are missed.
In order to make this sensors available in Openremote follow the steps:
Find the device Id using either EnOcean Dolphin View software or taking a look at EnOcean log file in Openremote which is under OpenRemote/logs/enocean subdirectory;
Create a new command for reading out the sensor using the device Id from the previous point and the D5-00-01 EnOcean Equipment Profile (EEP):
Create sensor and link it to the command created in previous step.
Now you should have a new sensor available in the Openremote Designer ready for use during UI design or rules definition.
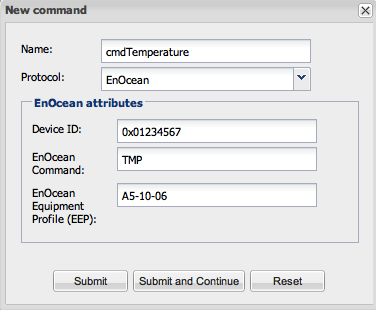
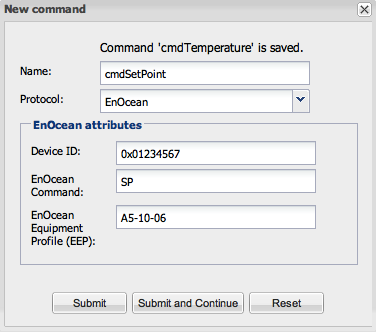
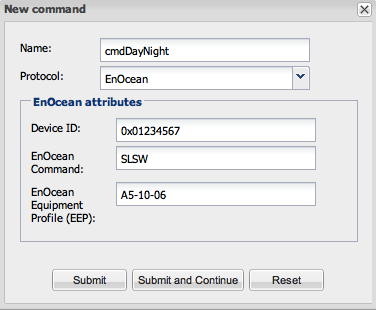
Eltako’s FTR55H is a temperature controller with 3 sensors on board:
temperature (TMP);
day reference hand wheel (SP);
night reduction slide switch (SLSW).
The datasheet is available on Eltako’s home page FTR55H.
In order to make these sensors available in Openremote follow the steps:
Find the device Id using either EnOcean Dolphin View software or taking a look at EnOcean log file in Openremote which is under OpenRemote/logs/enocean subdirectory;
Create new commands for reading out the sensors using the device Id from the previous point and the A5-10-06 EnOcean Equipment Profile (EEP):
Create 3 sensors and link them to commands created in the previous step.
Now you should have 3 new sensors available in the Openremote Designer ready for use during UI design or rules definition.
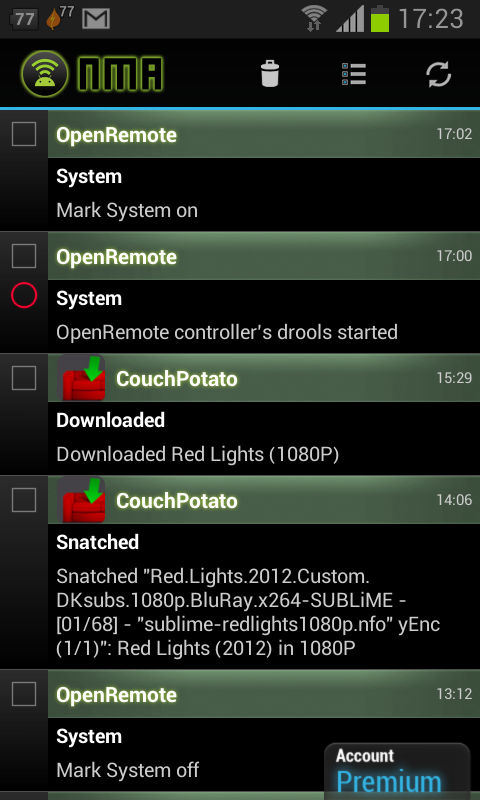
Openremote android app is not very useful for detecting alarm situations from OpenRemote. It lacks push notifications, however it is quite simple to use a 3rd party push solution like Notify My Android.
Here is example of NMA app screen on my smartphone with messages from OpenRemote:
The steps to do this are:
Create an account by Notify My Android and generate ApiKey which you will need for sending notifications. Put it in the following code in place of [your ApiKey from notifymyandroid.com].
NMA offers many APIs but for OpenRemote the most obvious one is Java api. Download NMAClientLib.jar and place it in OpenRemote-Controller/webapps/controller/WEB-INF/lib/ directory.
Add the following rules:
// Notify my Android NMA
import com.usk.lib.NMAClientLib;

declare NMA_message
  apiKey : String
  appName : String
  priority : int
  event : String
  desc : String
  devKey : String
end

declare My_NMA
  message : String
  priority : int
end

rule "System start"
when eval(true)
then
  My_NMA nma = new My_NMA("OpenRemote controller's drools started", 1);
  insert(nma);
end

rule "System NMA"
when
  $vt : My_NMA()
then
  NMA_message n = new NMA_message();
  n.setApiKey("[your ApiKey from notifymyandroid.com]");
  n.setEvent("System");
  n.setDesc($vt.getMessage());
  n.setPriority($vt.getPriority());
  n.setDevKey(null);
  insert(n);
  retract($vt);
end

rule "Notify my Android"
when
  $n : NMA_message()
then
  try{
    if(NMAClientLib.notify("OpenRemote", $n.getEvent(), $n.getDesc(), $n.getPriority(),  $n.getApiKey(), $n.getDevKey())!=1)
      throw new RuntimeException();
  }finally{
    retract($n);
  }
end
// NMA
This code will generate “OpenRemote controller’s drools started” notification with priority 1 each time the controller boots. Notifications are very handy for debugging rules file.
This demonstration shows integration of few home cinema components under the simpleremote concept. It shows how a cumbersome task of using a traditional remote control device in the modern home cinema setup can be simplified with the help of Openremote platform.
The test environment consists of:
Samsung TV UE46D7000 – LAN controlled;
Bose AV35 Home Theater – RS232 controlled;
Ferguson Ariva Satellite receive – LAN controlled;
Openremote eBox – controls everything;
EnOcean USB300 and PTM200 devices from EnOcean starter kit – energy harvesting devices (battery less).
During the demo you see how switching the source with Bose universal remote can be accelerated by the EnOcean 2 buttons switch. This is in fact not a demo but a real application which I’m using in my home everyday. Once I’ve made it I don’t want to switch sources traditional way anymore and I’m planning to buy more EnOcean switches and add them to my setup.
The integration of all components were possible thanks to the open source Openremote middleware. Although not visible on video, Openremote is the brain sitting behind all of this. I’m using a customized version of Openremote because not everything which I’m showing in this video is possible with the standard build. However, my changes are backward compatible, meaning that all Openremote legacy code would run on my version too. I’m planning to contribute my customization as soon as possible.
From the technical point of view the most interesting part is the usage of rules in Openremote to change buttons behavior based on a sensor value.
Here is code snippet a rule used for the ‘Switch TV’ button:
rule "Switch TV"
when
  ($evt : Event(source=="Button BI On", value=="ROCKER_BO_1")
       or Event(source=="V_TV STATUS", value=="ON"))
   $src : Event(source=="V1 STATUS")
then
  if($src.getValue().toString()=="TV")
  {
    execute.command("TV.PRECH");
  }else{
    System.out.println("Switch to TV");
    execute.command("BOSE.SELECT_TV");
    execute.command("TV.SOURCE_TV");
    TimeUnit.MILLISECONDS.sleep(500);
    execute.command("V1 ON","TV");
  }
end
As you see the button function depends on the “V1 STATUS” sensor value which keeps the current selected source.
If you want to know more about this example please leave a comment.
Recently I’ve purchased EnOcean starting kit as I think that energy harvesting solutions have big potential. They are batteries free therefore maintenance free. This is a big advantage comparing to other technologies. Anyway, the set has a temperature sensor which I’ve added to my OpenRemote controller and after linking it to a label I’ve noticed that its value has 2.5 centigrade offset comparing to my thermostat. Although, EnOcean claims that the sensor is calibrated I trust more my thermostat, the offset is simply too much!
Luckily for OpenRemote this is not a big problem. The solution is as follows:
have 2 sensors, the real that’s read from the device and a virtual linked to the user interface. Both should be custom sensors with the empty custom states list;
for the virtual sensor, you would have “In-memory Virtual Command” VTEMP, command: STATUS and address: VTEMP;
have a rule on the real value, do your computation, then call the write command.
The rule is (checked and tested to work correctly):
How am I going to interface with Bose Lifestyle Home Theater?
As you probably know Bose uses RF remote controls which are bidirectional (they send and receive data). This universal remote can takeover all other remotes therefore the Bose console itself is also capable to send IR signal. I was not sure what path should be the best therefore I’ve asked the question directly on Bose’s web site. After a while I’ve received the answer from customer support:
It’s possible to control your Bose V35 system via the serialdata input at the back of the console, with for instance Crestron equipment.
Of course I don’t want to use Cresteron but OpenRemote instead. I’ve asked them for the protocol explaining what I wanted to do. Unfortunately, the protocol is confidential and I had to sign a Non Disclosure Agreement before they were able send it to me. Nevertheless, I have it now and will be adding it to OpenRemote.
Before this I needed to physically interface with this serialdata input. I’ve searched internet for correct cable and oddly enough I was unable to find correct one for my config (eBox with USB)! So let’s go to China and indeed I was able to order a custom cable directly from manufacturer. The price was better than any partial solution available, including soldering it myself, but the catch was that I had to order at least a lot of minimum 10 pieces. This even not knowing for sure that it will work without problems :-0. Anyway, I’ve took the risk and here they are. I’ve plugged it between eBox and Bose V35, launched terminal and… it works!! 🙂 🙂 Now the real development and integration can start.
The only problem is that I have 9 more spare cables. I can imagine that there will be more people within OpenRemote community trying to control Bose equipment with the serialdata interface therefore I’m offering spare cables for sale. One can buy it from my online shop which is located here.
For the first task I’ve decided to add my home cinema hardware to OpenRemote. This is Bose Lifestyle V35 with great sound quality but rather cumbersome remote. It has a universal one which integrates all other remotes into its own but unfortunately it does not come without pain 😉 For example, when I’m watching TV and want to switch to Apple TV to listen some music streamed from my ITunes library then I need to do at least 8 button presses in correct order!
TV input button – to call TV source menu;
Down button – to change TV source from TV to HDMI1;
Source button – to call Bose’s source selection menu;
press three times Up button – to select Apple TV;
Menu button – to switch Apple TV on;
depending on Apple TV state multiple clicks to navigate to my iTunes library on one of my PC’s on the attic.
I’m sure that I can cut it to just one click using OpenRemote! Project started 🙂 Please follow the progress here.
 Eltako’s FTK is a wireless window/door contact. For more information see FTK data sheet. One he biggest advantage of these sensor is that they resend their status periodically which ensures correct state even if one of more messages are missed.